DataUnlocker protection modes – everything your web analytics needs to stay blocker-free
We have just shipped an important update to DataUnlocker – Protection modes. If you are rolling DataUnlocker onto a high-traffic site or simply want a safer, staged rollout, Protection modes give you precise control over how strict DataUnlocker will be on your pages.
DataUnlocker has protected analytics and marketing tags for 5+ years. Version 2.0 is a full remake that goes far beyond classic proxying – it couples analytics with your app so blockers cannot neatly remove one without breaking the other. In other words, if someone tries to unwire analytics, your web app can enter Limited Mode and refuse to run incorrectly, keeping your data truthful.
That power is great – and sometimes a little scary when you are new to DataUnlocker. So we made it configurable.
Quick refresher – how ad blockers break analytics
Modern blockers and privacy features like uBlock Origin, Brave Shields, Safari ITP, and Firefox ETP target both network requests and JavaScript APIs.
They match URLs like gtm.js, analytics.js, fbevents.js, or known URL patterns, and they hook browser APIs to suppress relevant calls. Result – 20–50% of events never reach GA4, GTM, Meta Pixel, TikTok Pixel, or Snap Pixel on typical audiences.
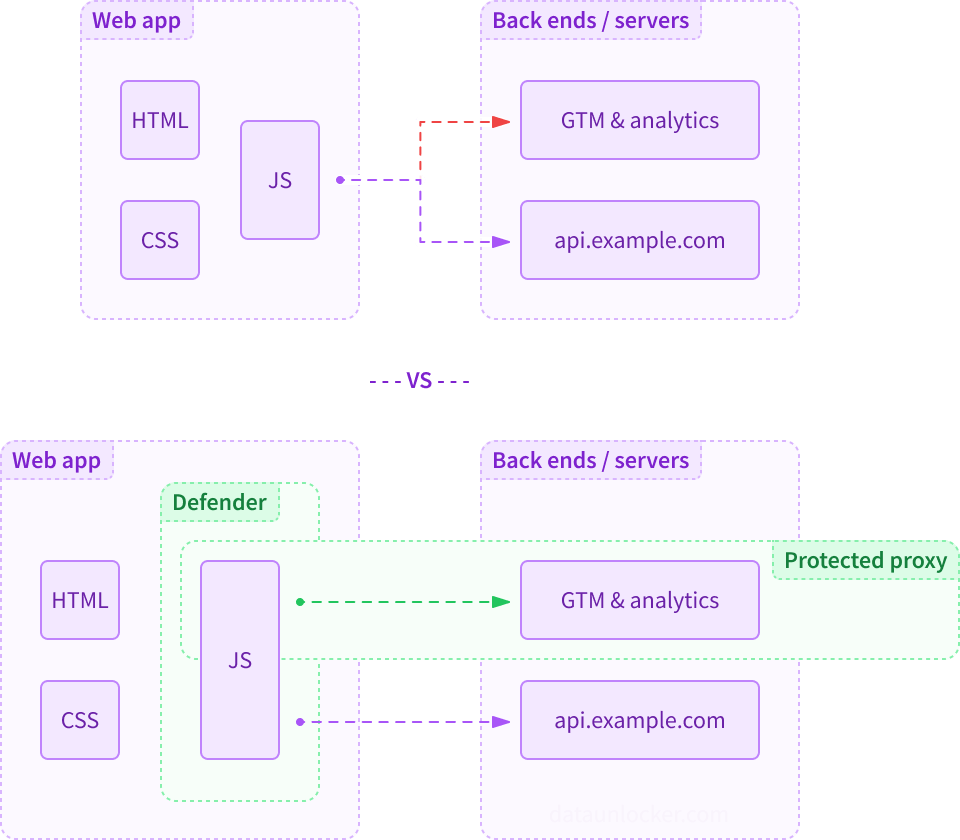
DataUnlocker 1.0 focused on proxying – re-addressing traffic so blocklists do not recognize it. DataUnlocker 2.0 adds two big pieces:
- Defender – a tight, code-level coupling with your app that hardens critical browser APIs and prevents clean separation of your app and the analytics it relies on.
- Network Protection with Resource groups – declarative rules to protect GA, GTM, Meta, TikTok, Hotjar, Posthog, Mixpanel and more via your Transport Endpoint.
Together with Secure Enclave for hosting tags and tracking scripts code and a Cloudflare-backed proxy edge, you get blocker-resistant, proxied web analytics that keeps working.
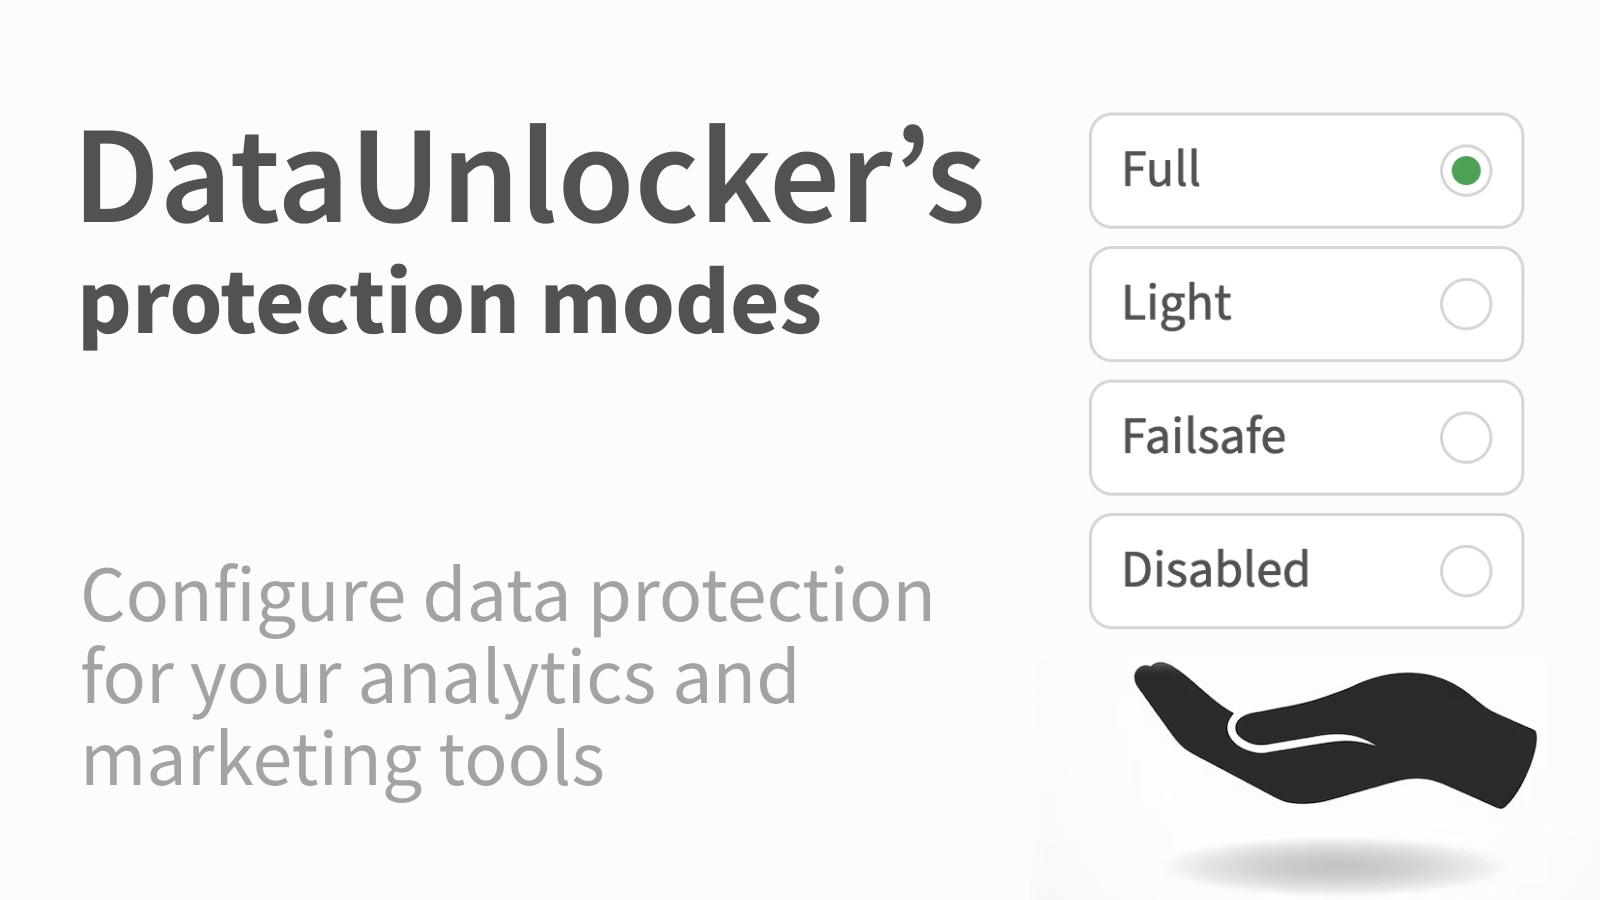
Meet Protection modes
Protection modes let you choose how strictly DataUnlocker should enforce protection and when to fall back to Limited Mode.
TL;DR – if you're rolling out DataUnlocker for the first time, start with Failsafe, then Light, then go Full once you are confident. You can flip modes anytime in DataUnlocker Admin.
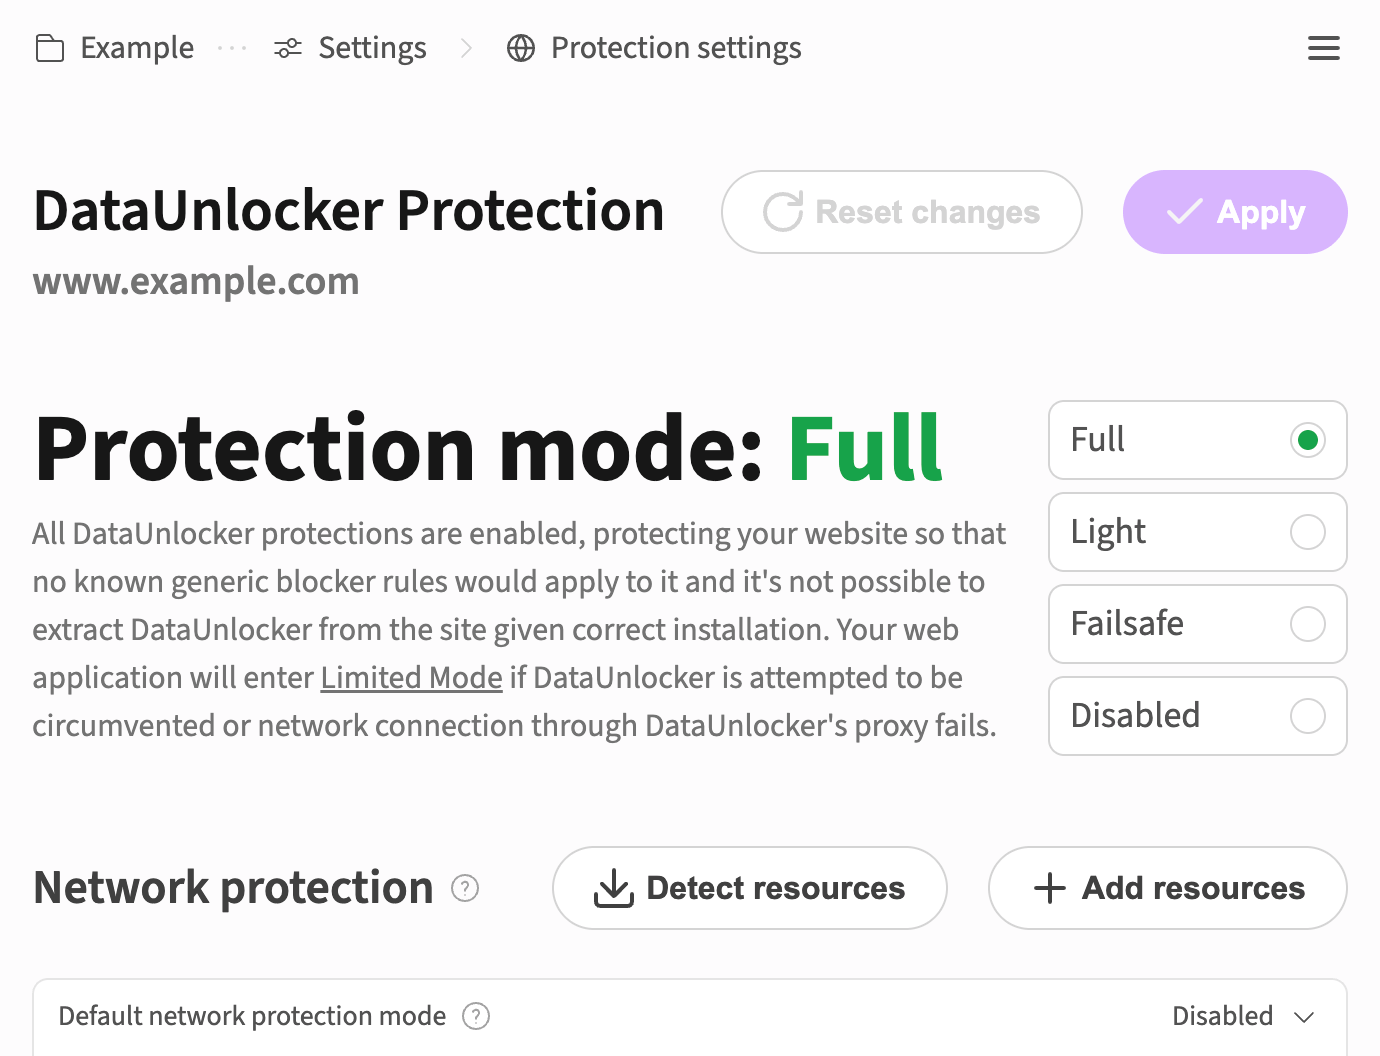
🟢 Full
- What it does: enables all JavaScript hardening and end-to-end network request protection. If DataUnlocker is tampered with or its protected routes fail, your app enters Limited Mode.
- When to use: mature rollouts and blocker-heavy audiences; properties where analytics accuracy is business-critical; on well-known domains.
- Why it matters: makes it infeasible for blockers to extract analytics from your app – unwiring analytics means the app does not run.
- Trade-offs: you must keep the Transport Endpoint reliable. Occasional Limited Mode can appear for users with flaky network connection.
🟡 Light
- What it does: keeps JavaScript protection on but skips end-to-end network request enforcement. Network failures will not trigger Limited Mode.
- When to use: intermediate rollouts; when you want the benefits of Defender and proxying but prefer not to interrupt the app on transient failures.
- Warning: in this mode, if your setup is discovered, blockers can unwire DataUnlocker from your site more easily than in Full mode. You can mitigate this by proxying your own API through DataUnlocker - read more below.
🟠 Failsafe
- What it does: applies network and JavaScript protections but will not activate Limited Mode due to blocking, network issues, or validation errors.
- When to use: first-day production rollouts; stakeholder sign-off phases; smoke-testing 2.0 on large sites.
- Warning: as with Light, a persistent targeted blocking could unwire DataUnlocker if discovered. You can mitigate this by proxying your own API through DataUnlocker - read more below.
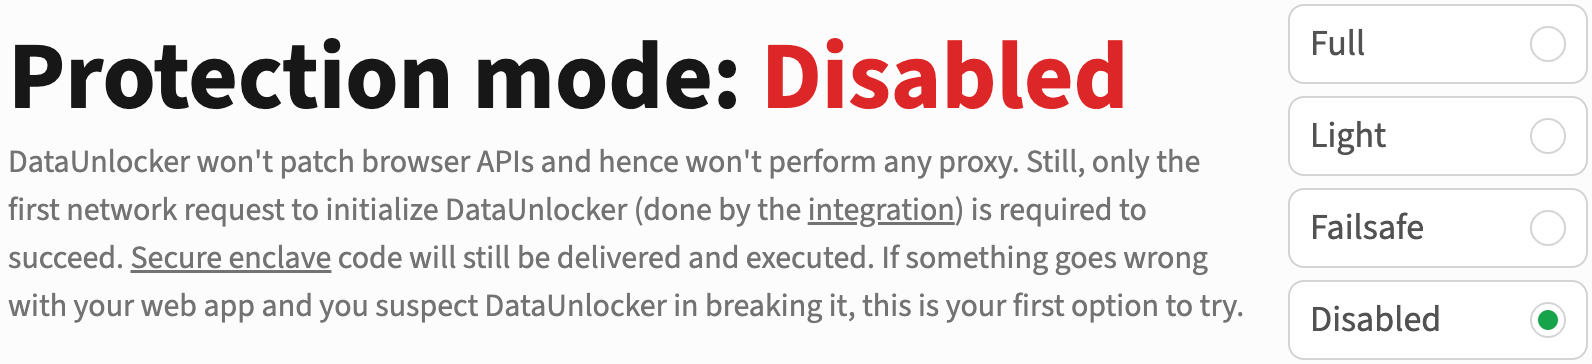
🔴 Disabled
- What it does: does not patch browser APIs and does not proxy analytics traffic. The initial handshake still loads to deliver Secure Enclave code, but DataUnlocker remains passive after that.
- When to use: emergency switch while investigating an unrelated app issue; A/B comparisons in production; support sessions.
Rollout playbook – from safe to strict
By default, DataUnlocker's protection is set to Full. But for obvious reasons, on production environments you may want to start with Failsafe or even Disabled.
The reason Protection Modes exist is fundamental to how DataUnlocker works. Defender is tightly integrated with your app's JavaScript at build time, which is key to making it unwirable by ad blockers. If it were easy to toggle off with a simple feature flag, it would be just as easy for a blocker to disable it.
Protection Modes provide a secure, server-side way to manage this powerful integration. This lets you deploy a single, protected build to production and then safely graduate its enforcement level.
When you're ready to deploy your DataUnlocker-enabled site, we recommend the following steps:
- In the DataUnlocker protection settings, start by selecting Failsafe mode. Then, enable relevant Resource groups (e.g.,
google,meta,tiktok). Deploy and let it run. - Watch your dashboard – in Admin, open your domain and review:
- Proxied services and request volumes
- Defender → Limited Mode candidates – by clicking the
?next todataunlockerresource group, you can see if any users would have entered Limited Mode under stricter settings - Network errors on your Transport Endpoint
- Expect a tiny baseline of Limited Mode – on real-world traffic, ~0.2% sessions can trip Limited Mode in strict setups due to long-lived tabs, laptops switching Wi-Fi, captive portals, etc. Spikes above that deserve a look. DataUnlocker currently works to bringing this value to 0% by making our defences smarter.
- Move to "Light" protection mode – keep the protection, avoid Limited Mode on transient network issues. Observe for a few days.
- Go Full – once you are confident in stability and coverage. From here, analytics becomes effectively unwirable from your app.
Rolling back is instant – flip the mode in Admin and click "Apply". Need a hand? Ping us via the support email in the footer or on Telegram.
Why DataUnlocker's Full mode is hard-to-impossible to unwire
DataUnlocker in Full protection mode binds three layers together:
- Code surface – Defender patches and guards critical Web APIs so analytics calls cannot be trivially suppressed while leaving the app intact.
- Network surface – traffic to analytics providers and your first-party destinations is routed through your Transport Endpoint, making URLs blocklist-agnostic and cryptographically bound to your domain.
- Runtime validation – if the binding is broken or the protected paths stop responding, the app enters Limited Mode rather than silently losing analytics.
Thus DataUnlocker makes the web app resistant to JavaScript and network patches – exactly what ad blockers and network privacy filters target, restoring web app's original implementation. You can read more about how DataUnlocker's analytics and marketing tools protection works in our docs.
The "Unwirable" Trick: Prove It Yourself
Still skeptical that DataUnlocker can be made impossible to circumvent? Here’s a simple trick to prove it.
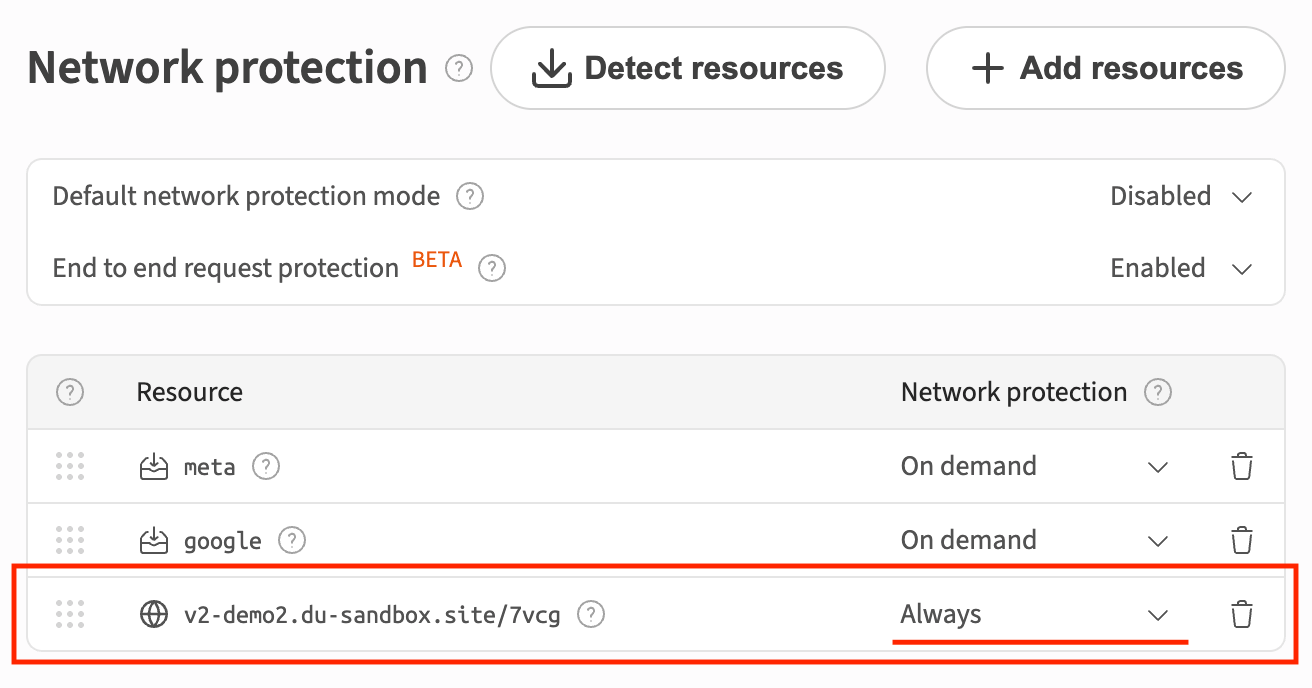
DataUnlocker's Network Protection isn't just for third-party analytics. You can configure it to proxy everything, including your own API calls.
To give you an example, imagine you have a critical API call, like GET /api/user, allowing to get the current user's details.
By routing this request through DataUnlocker's proxy, you create a dependency.
If an ad blocker manages to block DataUnlocker, it will also block web app's functionality.
This can be configured in DataUnlocker with a single new line (example.com/api/user) added to a Network Protection config:
And to lock it in completely, for instance, you can make your proxy (a transport endpoint in front of DataUnlocker's proxy) add a "secret" header that your back end API would consume and check. This way, you can maky your API call to not succeed without DataUnlocker's proxy.
This makes targeting DataUnlocker a self-defeating exercise for ad blocker filter list maintainers. Their goal is to block ads, not break websites. By making your analytics protection integral to your site's function, you make it an untouchable target.
This is possible because DataUnlocker is an end-to-end, cryptographically-secured proxy built on the highly reliable Cloudflare network. Everything that passes through it is shielded from blockers.
Cloudflare backbone – reliability at the edge
Our proxy runs on Cloudflare – a global anycast network built for scale and resilience.
If your site already uses Cloudflare, integration is even smoother; you would just need to create a Cloudflare worker and point it to your proxy. If not, setup still takes under 5 minutes in most cases if you know how to set up a basic HTTP proxy.
Either way, your Transport Endpoint would live close to your users with built-in DDoS protection and TLS.
Configuration tips
- Use Resource groups – toggle providers you care about:
google,meta,tiktok,snap,segment,mixpanel,hotjar, and more in Network Protection. - Move tag code to Secure Enclave – store GTM/GA/Pixel snippets in Secure Enclave so blockers cannot pattern-match them. Our team monitors Secure Enclave contents on a regular basis and we're set to roll out updates if it's attempted to be exploited.
- Audit third-party forms and widgets – if your conversion happens inside Typeform, Intercom, or a headless form provider, pass client events to your website/platform manually or use CAPI to back your browser tags.
- Monitor Limited Mode – brief bursts can be normal. Sustained growth usually points to a Transport Endpoint or JavaScript misconfiguration.
FAQ
Will SEO be affected?
No – DataUnlocker touches analytics and app APIs you select; it does not modify HTML rendering or crawlers. You can leave your assets, sources and public files unprotected.
What about performance?
Proxy latency is typically single-digit ms when your Transport Endpoint is regionally close and warmed up.
Does this replace server-side tagging?
No – DataUnlocker happily coexists with Server-Side GTM.
Just remember that ssGTM by itself does not turn browser-sourced events into server-sourced ones – they can still be blocked.
See our deep-dive.
Get started
- Create an account at admin.dataunlocker.com and add your domain – you get free filter-list visibility for your site immediately.
- Add a Transport Endpoint and install Defender – see the setup guide.
- Enable Network Protection and choose your Protection mode – start with Failsafe, then Light, then Full.
Your analytics deserves to be blocker-free, while staying compliant with privacy standards – and now you have more controls in how you get there.